The battle for the top 4 positions in the Premier League saw these 2 sides come together. Tuchel was unchanged in his preffered formation since his start at Chelsea with a 3-4-3 positional play looking to dominate the ball, whilst Ancelotti understands he won’t be seeing a lot of the ball and opts for a 5-2-1-2. Whilst this battle went on it was Kai Havertz that shone on the day through his dynamic off the ball movement.
Tuchel – the set-up so far
Tuchel a herald of Guardiola’s ‘juego de posicion’, looks to have high possession in games and maximise returns of his players by putting them in their favoured areas of the pitch in which they specialise. I.e. Reece-James in right-midfield during build-up or Timo Werner making half-space runs, on the shoulder of the defence line or Marcos Alonso at LW. Off-the ball they come with a ferocious press and block passing lanes quickly seeing them regain possession. Once won instead of countering, they go backwards to Christensen who then settles play and orchestrates around the back and into the 2 central midfielders. He does this to create much more controlled attacks. The back 3 allow quick ball circulation in build-up shifting the ball from side-to-side, putting less pressure on Mendy to build in goal. An ageing Azpilicueta comes back in, in arguably his best position at RCB and Zouma/Rudiger at LCB look to bomb into space ahead due to Alonso staying high when playing out from the back.
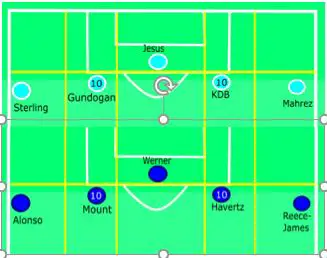
Werner holds the line whilst the other 2 inside forwards, look to receive and progress the ball into the final 3rd. As mentioned Guardiola and Tuchel have their similarities in how they use possession and also notably how they fit 2 #8’s/#10’s, within Zone 14 also known as the ‘golden zone’ where most chance creation and goal-scoring opportunities come. However, you also need width to allow these players the freedom they need. As you can see from the diagram, even though Chelsea play 3-4-3 and Man City 4-3-3, their layouts both find a way to give width and 2 creators to support the striker.
Havertz creating overloads
Everton chose a mid-block and their main focus was to stop Chelsea from getting into the final 3rd. Due to the limitations of the 3-4-3 and Chelsea starting the game with no Mount, it can be difficult to progress the ball past the midfield line and instead ‘passing sideways’. This led to Hudson-Odoi spinning in behind from time-to-time to receive. Alonso and Reece-James were not pressed by Everton’s respective wing-backs but instead the LCM/RCM (Gomes & Allan), leaving a flat back 5 for Everton in the final 3rd. Furthermore, Everton had a midfield 3v2, meaning they could not only control Kovacic and Jorginho but move out wide towards Chelsea’s wing-backs as well.
Whilst Alonso and Werner would pin the back 5, it was deadly important Havertz and Hudson-Odoi dropped deeper to receive in Everton’s midfield 3s blind spots. This was the reason Havertz was brought in for this game. At Bayern Leverkusen, his speciality was creating these overloads and space for others in Peter Bosz high-possession side. You can see just how influential he was in his deep striker role as he had 53 touches, almost more than any Everton player! (Digne, 65).

Chelsea’s back 3 and midfield 2 played around, Havertz would make little runs in the middle to try and make it a 3v3 in the middle, to receive and turn into the final 3rd. Neither of Everton’s CBs would come out with him, to avoid gaps in behind for Werner. Furthermore, when the ball went out wide, Havertz would be close to either Alonso or Reece-James so therefore when Andre Gomes or Allan when to press the wing-back, they had a 2v1 to deal with making Havertz or 1 of Chelsea’s wing-backs the free player. Havertz wasn’t done there, he would constantly make runs in behind to stretch the defence and find players blind side’s – exactly how the 1st of the night came. Once Everton went to a 4-4-2 diamond in the 2nd half, Havertz movement caused even more problems as he managed to get in behind and win a penalty for his team.